Showing posts with label nest eggs. Show all posts

Wednesday, June 25, 2008

An Easy, Elegant Centerpiece

If you read my e-zine, Feather Your Nest, these images may look familiar to you. (If you don't and you'd like to subscribe for free, go to the right sidebar to sign up!) I wanted to share this idea for a really easy centerpiece that will look like you fussed over it for hours...but of course it took five minutes (which is all I ever seem to have when getting ready to host).


The white runner? It's butcher paper, from my daughter's craft easel. It's a casual look that kind of reminds me of those bistros where the tables are covered with white paper.

Then, I just took three different sizes of square vases. You could use round vases...or square ones...or bowls...just pick three vessels that all have something in common. It could be different sizes and shapes of teapots or water pitchers.

I purchased two bouquets of cut flowers - one of green spider mums, the other of white calla lillies. I simply floated one large bloom in the 4" tall vases. Then, I let the bunch of calla lillies fall casually to the side of one of the tall vases. I arranged the rest of the mums without stems showing above the top of the vase, and voila! A fresh and casually elegant centerpiece for brunch (or whatever occasion you'd like).

Thursday, March 13, 2008

I'll have my {Easter} eggs over-easy, please

So a few quick photos of Easter prep around my house (by quick, I mean: note the wrinkled tablecloth...haven't exactly had time to iron it yet. But in all honesty, will I ever? That's the question.) Here's an easy centerpiece made with Spanish moss, a fruit compote dish, a wine glass, and a small vase, all in pastel colors (with a few green votive holders sprinkled in). These are sparkly egg ornaments from Michael's (purchased last year) but you could use whatever kind of egg you wanted. I used a pastel cloth napkin in a large plaid over a small contrasting plaid tablecloth.
A potted branch from a curly willow tree that I've propped in the corner and hung with a few more egg ornaments (also from Michael's). I haven't made the ornaments yet that I referenced in my March e-zine, so these are it for now.


My adorable little Easter lights...which are almost as cute off as they are on! (Maybe even more so?!) Purchased on clearance just before Easter last year at Fred Meyer.

My Easter wreath on the front door. Usually I go for more natural-looking decor, but this one practically shouted, "Courtney! You must buy me!!" Just $12.99 at TJ Maxx this year. So fun and sort of retro. (When else can you cover your front door with feathers and aqua-colored eggs?)

For more decorating ideas, you've got to check out this post and this post from Melissa at The Inspired Room. It doesn't get more extensive than this - I love all the simple and affordable ideas she's pictured for Easter decorating. (Melissa's blog is a favorite of mine anyway, because she and I have very similar businesses and similar philosophies when it comes to decorating - so you should definitely check out her blog.)

Tuesday, March 4, 2008

Easter Grass


I love the idea of using real wheatgrass as part of your Easter decor. It is charming and simple...and the complete antithesis of silk flowers, which I am not fond of. I love the idea of finding a unique vessel to grow the grass in (it would only be in use for a couple of weeks) and then using the grass to display Easter eggs (either real or decorative only). Anyway, check out the idea and tutorial from Design Mom today (photo from flickr, courtesy of DesignMom).

Monday, February 4, 2008

Contain the Clutter

Anyone who's seen my home office knows that I am not exactly an expert when it comes to organizing! (Watch the blog for my upcoming home office re-do...I'm saving up...and soon it will be a beautiful before-and-after story!) But, anytime I can contain clutter and make it "pretty" at the same time, it makes me happy. Have you ever found there are just certain things that pile up in certain areas of the home? Remote controls, magazines, and coasters in the living room. Napkins, sugar & creamer, salt & pepper in the kitchen...toiletries, wash cloths, perfumes in the bathroom. First, group like items together and see what you've got that needs to be contained. Next, find around the house - or go shopping! :-) - one of the following two items:


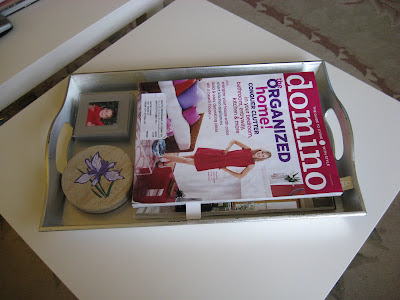
#1: A beautiful tray. This can be wooden, metal, rattan...whatever fits your style. It's my favorite way to corral all the little things and make them look like part of one larger unit of items. Pictured here is the tray I have on my coffee table, holding a few current magazines and some coasters. (By the way, my current coffee table is actually made up of two end tables placed right next to each other...so the photo below is of the other "half" of the coffee table).


#2: Baskets. Since they come in just about every shape, size, and color...not to mention, with lids or without, with handles or without, etc....they are a great solution for containing and hiding clutter. Pictured here is the cracker basket by Longaberger, which is perfect for holding my family's FOUR remote controls (perhaps one day we'll take the plunge and actually invest in a universal remote control!).

Tuesday, January 22, 2008

I've been framed

It may seem simple, but I am often surprised by what a difference it makes to simply re-frame family photos into coordinating frames. Check out the impact it makes on my stairs.
Some of my photos are black and white, some are in color. But simply being framed in black or white brings them all together. It's easier on the eye and creates a gallery effect rather than a hodge-podge. It gives my humble snapshots a sense of importance.
By the way, to create a similar look on a staircase wall, start with a few big photos along the bottom (in this case, just above the railing) to anchor the look. Then, fill in the gaps with smaller frames.
This tip goes for a collection of photos on the wall, on a sideboard, on a piano, or on a desk. If you can't afford new frames, I've got two words for you: "Spray Paint". Yep, just pick a color and paint all your frames the same one or two colors. It's 15 minutes that will be well worth it in the end.

Thursday, January 17, 2008

Pretty Green


"It's not easy being green." -Kermit the Frog


...but it's getting easier! One of Target's new eco-friendly product lines that I just love is the method line of dish soaps, hand soaps, and environmentally friendly cleaners. I have to admit that "being green" has not always been a top priority of mine, but it's climbing...and with all the fun products out there, they're making it attractive to be "green" too (which is a must for me). What I love about the method soaps and cleaners:

1. Cool bottle...it looks great at my sink
2. Great scents...cucumber melon is my favorite (as you can see from the photo)
3. It's affordable
4. And, of course, it's biodegradeable and made without phosphate and with Vitamin E & Aloe added in.

Result: it looks good, doesn't ruin my hands and smells natural, not like chemicals. Love it!

Wednesday, January 16, 2008

beautiful nests


Here's a photo of some of those cute nests I picked up yesterday at Home Goods. I love this kind of seasonal decor - understated and natural...but elegant at the same time. Technically, it's for Easter...but I am longing for spring so much already, that I think this will become part of my decor right away.

Thursday, January 10, 2008

cheap and simple centerpiece


Instead of fresh flowers in a vase, why not try some citrus in a simple bowl or vase? I mentioned this idea in this month's ezine using lemons or limes. Here's a "twist" on that idea...

The other day I wanted to buy limes for an arrangement. Oh my word, they were expensive! And lemons too. Ah, to live in California where they - literally - grow on trees! So I was pretty happy to discover that Winco has huge bags of tangerines for $1.99 right now. I supplemented with just a handful of lemons and it's a simple but fun arrangement that reminds me just a little of summer. You could stretch your dollar even further by wadding up some newspaper in the very bottom of the bowl and then arranging your citrus on top of that.

For a more shabby chic look, I've paired tangerines and lemons with a white footed bowl and a vintage tablecloth. For a more modern look, I would put those same tangerines and lemons into a large, clear, square vase I have and place that on top of a simple runner.

Friday, January 4, 2008

$5.98 has never gone so far!

Okay, Martha Stewart I am not. Neat and tidy I am not. But over the holidays, every time someone came over, I had nowhere to put their coats. Not an earth-shattering dilemma, of course, but one that I was not content with leaving as-is. To start with, our coat closet is absolutely minute; our house was built in the 1920's - need I say more? To make matters worse, there's a heating duct that cuts off the back 1/3 of the closet, leaving 1/3 of the coat-hanging rod unusable. There is also no shelving or room for shelving. We have nowhere else to store our vacuum - so that lives in there too. I guess because it's January and it's traditionally a time to get organized, I finally got inspired to do something about it. I literally spent $5.98 at Ikea and spent about 15 minutes, and voila! I have a functional, organized coat closet that I'll even be able to let visitors put their coats in. Here's what I did:


1. Took all the coats out of the closet and separated three ways: coats that are never worn, which I'll donate to CityTeam Ministries, coats that are worn infrequently and so go in our bedroom closets, and coats that we wear all the time and will stay in the closet.


2. Took all the other junk out of the closet. Discovered we owned not one, not two, but SEVEN lint rollers in various states of use and un-use. Threw away 3 of them, vacuumed the killer dust-bunnies that remained.


3. Took out all the mis-matched plastic and wire hangers...replaced them with a set of 8 wooden hangers from Ikea which cost $3.99 total.


4. Hung an organizer from Ikea ($1.99 -I think it's supposed to be for shoes) strategically in front of the heating duct - thus making that space usable again! This is now used for lint rollers (only 4 now!), hats, gloves, and vacuum bags (yep, that thing had to go back in too).


With all the other things that need doing in my house, this probably wasn't that important to do NOW, but the sense of satisfaction it gave me just couldn't go without a mention on the blog. Maybe you'll be inspired to tackle some project yourself this weekend. Good luck!


(I have to warn you: the photo still isn't PRETTY...but you should have seen the BEFORE! :-) That black thing is my lovely vacuum, eating up valuable real estate.)